Beauty & Personal Care > Tools & Accessories > Nail Tools > Electric Nail Files
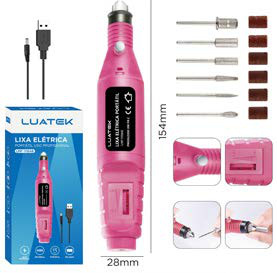
Portable Electric Nail File Kit, 6 Tips, 120V AC, LMF-1115AB
Brand: Generic / OEM
•
Audited BOM: 8 Components
🛠️ Troubleshooting Guide & Return Mitigation
Verified Self-Service BasePractical guide for your LMF-1115AB electric nail file: correct usage, troubleshooting, and damage prevention to ensure durability and performance.
RMA Prevention Tags:
#correct_bit_usage
#cleaning_after_use
#avoid_overload
#check_voltage
🔍 Colloquial Consumer Search Queries:
“portable electric nail file not working”
“electric nail file 220v”
“electric nail file bit loose”
“electric nail file gets too hot”
“how to use electric nail file for manicure”
🚀 Quick Start & Safe Operation Guide
1
Connect the power adapter to the 220V outlet and the electric nail file.
🔒
+3 Detailed Operational Steps Locked in Torfus Pro
Unlock Steps
⚡ Easy DIY Troubleshooting & Common Fixes
🔧
prob_01
The electric nail file does not turn on.
Common root cause: Loose power connection or outlet has no power.
Step-by-step solution: Check if the power cord is securely connected to the nail file and the outlet. Test the outlet with another device.
💡
Pro tip: Always use the correct 220V outlet and avoid multi-plug adapters.
📸
Evidence to provide support: Short video (5-10s) showing cable connection to outlet and device.
🔒
+2 Exclusive Verified Technical Solutions Locked
Engineering diagnostics for mechanical jams, thermal overloads, and seal failures available in the Full Dossier.
Unlock Full Guide
🚫 What NEVER to Do (Common Misuse Warnings)
⚠️ Forcing the bit into the chuck or attempting to change the bit while the device is on.
err_01
Consequence: Damage to the chuck mechanism, difficulty changing bits, or chuck breakage.
✓ How to avoid: Always unplug the device from the power outlet before changing or adjusting bits. Insert bits gently until you feel them lock into place.
🔒 +2 Critical Misuse Warnings Locked
Engineering alerts to prevent motor burnout, voided manufacturer warranty, and catastrophic component breakdown.
View All Warnings
⚙️ Hardware Setup, Adjustments & FAQs
🔒 +1 Hardware Setup & Calibration FAQs Locked in Torfus Pro
Unlock
⚖️
⚖️ Seller Warranty & Marketplace Dispute Conciliation
If, after following all usage and troubleshooting instructions, the device exhibits functional failures that cannot be resolved (e.g., motor does not turn on, excessive and abnormal noise, immediate overheating without use), activate the warranty under the seller's warranty and marketplace return policy, as it may indicate a manufacturing defect.